Complete SurveyJS with Angular Tutorial
SurveyJS is an Open-Source JavaScript Form Builder Library.
Although SurveyJS provides native support for React, Vue, Angular, and Knockout, this article serves as a comprehensive guide on how to use the SurveyJS library in an Angular Project to create dynamic surveys, quizzes, polls, and forms in your web applications.
If you’re curious, scroll down to see the final results
Setting Up the Project
Begin by creating a new Angular Project and then install the following npm packages based on the version of Angular you are on.
If you use Angular v12 or newer, install the Survey Angular UI Package, using the following npm command. This will install the ‘survey-core’ package automatically because it is listed in
survey-angular-uidependencies.
npm install survey-angular-ui --saveFor earlier Angular versions(v8 to v11) install the Survey Angular Package, using the following npm command.
npm install survey-angular --saveConfiguring SurveyJS Styles
SurveyJS offers different themes to style your surveys. In the ‘angular.json’ file, add the desired theme to the ‘styles’ array. The example below applies the Default theme. As I can override it later if I want to apply a different predefined theme or create a custom theme, refer to the last section for detailed instructions.
"styles": [
  "src/styles.css",
  "node_modules/survey-core/defaultV2.min.css"
],
Defining the Survey Model
SurveyJS models are JSON objects that define the structure of your survey, i.e. the type and content of the questions(and responses) you want to include in your survey. Therefore, define your model to suit the survey(or form) you intend to create.
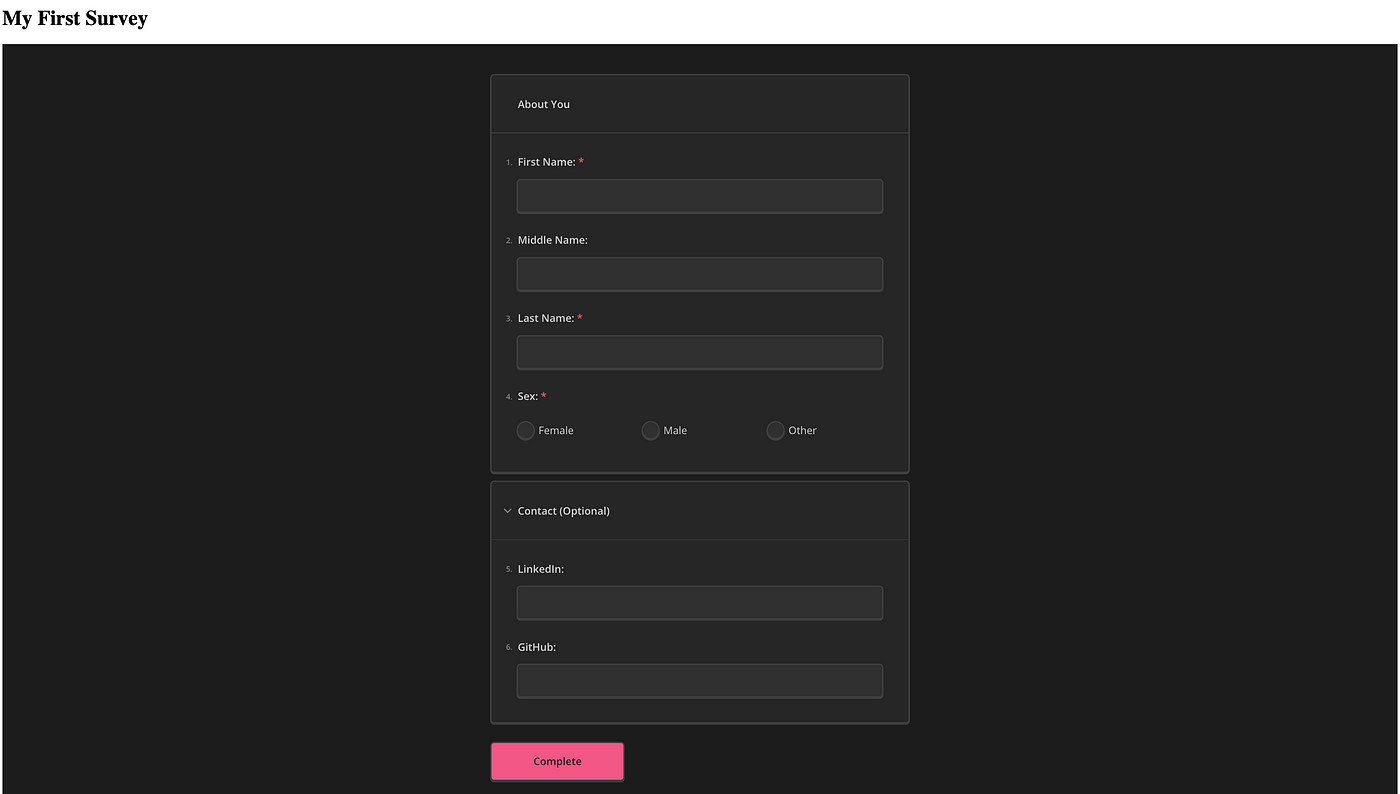
So, in our example here, I am going to divide my form into 2 sections — a compulsory “About You” section and an optional “Contact” section. I will prompt the user to fill in the following details about themselves in the “About You” section, 4 questions — First Name, Middle Name, Last Name, and Sex. Everything is required but the Middle Name, because if you think about it logically, not everyone has a middle name. In the “Contact” section, the user can provide their LinkedIn and/or GitHub Link.
Let’s start by importing the ‘Model’ library from the ‘survey-core’ package.
import { Component, OnInit } from '@angular/core';
import { Model } from 'survey-core';

@Component({
  selector: 'my-app',
  templateUrl: './app.component.html',
  styleUrls: ['./app.component.css'],
})
export class AppComponent implements OnInit {
  title = 'My First Survey';
  survey: Model;
  surveyJson = {
    elements: [
      {
        name: 'about',
        title: 'About You',
        type: 'panel',
        elements: [
          {
            name: 'firstname',
            title: 'First Name:',
            type: 'text',
            isRequired: true,
          },
          {
            name: 'middlename',
            title: 'Middle Name:',
            type: 'text',
          },
          {
            name: 'lastname',
            title: 'Last Name:',
            type: 'text',
            isRequired: true,
          },
          {
            name: 'sex',
            title: 'Sex:',
            type: 'radiogroup',
            colCount: 3,
            isRequired: true,
            choices: ['Female', 'Male', 'Other'],
          },
        ],
      },
      {
        name: 'contacts',
        title: 'Contact (Optional)',
        type: 'panel',
        state: 'collapsed',
        elements: [
          {
            type: 'text',
            name: 'linkedIn',
            title: 'LinkedIn:',
          },
          {
            type: 'text',
            name: 'gitHub',
            title: 'GitHub:',
          },
        ],
      },
    ],
  };

  ngOnInit(): void {
    this.survey = new Model(this.surveyJson);
  }
}
Integrating SurveyJS Form Library into Angular
You must be thinking about how and when are we going to use the actual ‘survey-angular-ui’ package we installed for Angular, so here is the answer we are going to use the ‘Survey Module’ library from this package to integrate and render the Survey using Angular. To do this, add the following code to your app.module.ts file.
import { NgModule } from '@angular/core';
import { BrowserModule } from '@angular/platform-browser';
import { FormsModule } from '@angular/forms';

import { AppComponent } from './app.component';

import { SurveyModule } from 'survey-angular-ui';

@NgModule({
  imports: [BrowserModule, FormsModule, SurveyModule],
  declarations: [AppComponent],
  bootstrap: [AppComponent],
})
export class AppModule {}
Rendering the Survey
Here comes the easiest yet the most fun part, to render the survey all you need to do is add the ‘survey’ element to your component template(app.component.html file) and bind its ‘model’ attribute to the model instance we created before, called ‘survey’.
<h1>{{ title }}</h1>
<survey [model]="survey"></survey>
Handling User Responses
You can also utilize the ‘onComplete’ event of the survey object to trigger a function when the user submits their responses. Inside this function, you have access to the collected data, therefore, you can process it as needed. For instance, in my demonstration below, I am just going to use the ‘alert’ function in the browser to display the user’s entered data.
import { Component, OnInit } from '@angular/core';
import { Model } from 'survey-core';

@Component({
  selector: 'my-app',
  templateUrl: './app.component.html',
  styleUrls: ['./app.component.css'],
})
export class AppComponent implements OnInit {
  title = 'My First Survey';
  survey: Model;
  surveyJson = {
    .....
  };

  alertResults(sender) {        // note #2
    const results = JSON.stringify(sender.data);
    alert(results);
  }

  ngOnInit(): void {
    this.survey = new Model(this.surveyJson);
    this.survey.onComplete.add(this.alertResults); // note #1
  }
}
Overriding Default Theme (Using a Custom Theme)
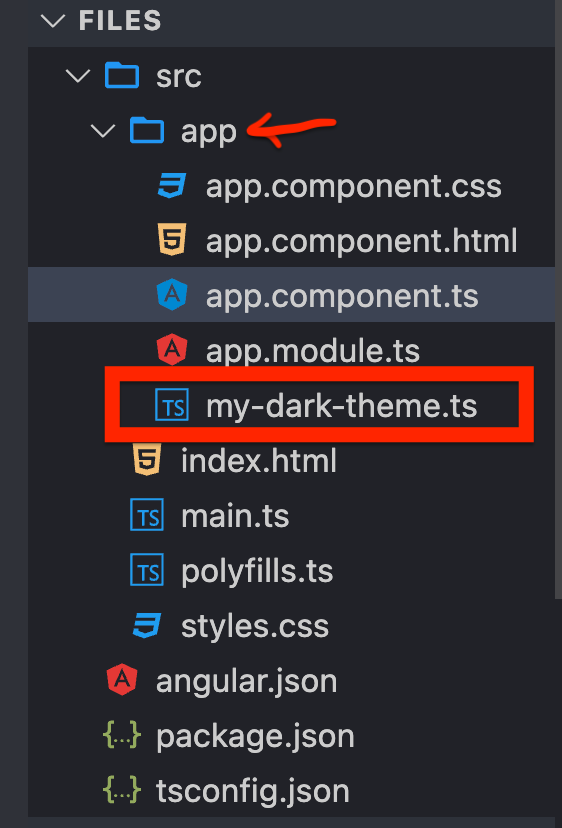
SurveyJS themes are set to use a variety of CSS variables to specify colors, fonts, sizes, and other survey appearance settings. To create a custom theme, all you need to do is change these variables to adjust them according to your preferences. In my demonstration below, I have added an additional file to my app directory called, my-dark-theme.ts, where I have defined the values of these CSS variables.
const Theme = {
  cssVariables: {
    '--sjs-general-backcolor': 'rgba(38, 38, 38, 1)',
    '--sjs-general-backcolor-dark': 'rgba(48, 48, 48, 1)',
    '--sjs-general-backcolor-dim': 'rgba(28, 28, 28, 1)',
    '--sjs-general-backcolor-dim-light': 'rgba(48, 48, 48, 1)',
    '--sjs-general-backcolor-dim-dark': 'rgba(58, 58, 58, 1)',
    '--sjs-general-forecolor': 'rgba(255, 255, 255, 0.78)',
    '--sjs-general-forecolor-light': 'rgba(255, 255, 255, 0.42)',
    '--sjs-general-dim-forecolor': 'rgba(255, 255, 255, 0.79)',
    '--sjs-general-dim-forecolor-light': 'rgba(255, 255, 255, 0.45)',
    '--sjs-primary-backcolor': 'rgba(243, 87, 134, 1)',
    '--sjs-primary-backcolor-light': 'rgba(255, 255, 255, 0.05)',
    '--sjs-primary-backcolor-dark': 'rgba(250, 118, 157, 1)',
    '--sjs-primary-forecolor': 'rgba(32, 32, 32, 1)',
    '--sjs-primary-forecolor-light': 'rgba(32, 32, 32, 0.25)',
    '--sjs-base-unit': '8px',
    '--sjs-corner-radius': '4px',
    '--sjs-secondary-backcolor': 'rgba(255, 152, 20, 1)',
    '--sjs-secondary-backcolor-light': 'rgba(255, 152, 20, 0.1)',
    '--sjs-secondary-backcolor-semi-light': 'rgba(255, 152, 20, 0.25)',
    '--sjs-secondary-forecolor': 'rgba(48, 48, 48, 1)',
    '--sjs-secondary-forecolor-light': 'rgba(48, 48, 48, 0.25)',
    '--sjs-shadow-small':
      '0px 0px 0px 2px rgba(64, 64, 64, 1),0px 2px 0px 2px rgba(64, 64, 64, 1)',
    '--sjs-shadow-medium':
      '0px 8px 0px 2px rgba(64, 64, 64, 1),0px 0px 0px 2px rgba(64, 64, 64, 1)',
    '--sjs-shadow-large': '0px 0px 0px 0px rgba(0, 0, 0, 0.1)',
    '--sjs-shadow-inner':
      '0px 2px 0px 2px rgba(64, 64, 64, 1),0px 0px 0px 2px rgba(64, 64, 64, 1)',
    '--sjs-border-light': 'rgba(255, 255, 255, 0.12)',
    '--sjs-border-default': 'rgba(255, 255, 255, 0.12)',
    '--sjs-border-inside': 'rgba(255, 255, 255, 0.08)',
    '--sjs-special-red': 'rgba(254, 76, 108, 1)',
    '--sjs-special-red-light': 'rgba(254, 76, 108, 0.1)',
    '--sjs-special-red-forecolor': 'rgba(48, 48, 48, 1)',
    '--sjs-special-green': 'rgba(36, 197, 164, 1)',
    '--sjs-special-green-light': 'rgba(36, 197, 164, 0.1)',
    '--sjs-special-green-forecolor': 'rgba(48, 48, 48, 1)',
    '--sjs-special-blue': 'rgba(91, 151, 242, 1)',
    '--sjs-special-blue-light': 'rgba(91, 151, 242, 0.1)',
    '--sjs-special-blue-forecolor': 'rgba(48, 48, 48, 1)',
    '--sjs-special-yellow': 'rgba(255, 152, 20, 1)',
    '--sjs-special-yellow-light': 'rgba(255, 152, 20, 0.1)',
    '--sjs-special-yellow-forecolor': 'rgba(48, 48, 48, 1)',
  },
  isPanelless: false,
};
export default Theme;
Next, to display this style on the UI, I will use the ‘applyTheme’ method on my model instance called ‘survey’(in the app.component.ts file) and pass the JSON object containing the CSS variable definition in the ‘my-dark-theme.ts’ file, we just created.
import { Component, OnInit } from '@angular/core';
import { Model } from 'survey-core';
import Theme from './my-dark-theme'; // note #1

@Component({
  selector: 'my-app',
  templateUrl: './app.component.html',
  styleUrls: ['./app.component.css'],
})
export class AppComponent implements OnInit {
  title = 'My First Survey';
  survey: Model;
  surveyJson = {
    .....
  };

  alertResults(sender) {
    const results = JSON.stringify(sender.data);
    alert(results);
  }

  ngOnInit(): void {
    this.survey = new Model(this.surveyJson);
    this.survey.applyTheme(Theme); // note #2
    this.survey.onComplete.add(this.alertResults);
  }
}
Finally, the end result looks something like this:
And we’re done! I hope the information provided in this article provides value to you and helps you simplify and optimize your Dynamic Form Creation and Management experience with Angular.
PS, if you’re more of a visual person, check out the video below for the full tutorial.


